

Hi folks, hope everyone is well.
A quick thank you for all your very lovely comments about the field mice, I read and appreciate every one :o) Just to reply to a couple of you, our front garden is quite small, (it's where the hoggies live) so I was able to get within about five or six feet to take the photos.
Now, on to this post. (Warning! This is long and photo heavy, but I hope interesting.)
On Saturday, I went with four very dear friends (Ann, Jan, Sandy and Kylie) to the lovely Gleanings Rural Study Centre , in my neighbouring county, deepest, delightful Shropshire near the Welsh border for a day course, 'An introduction to basket making'. An early start for me as I had to leave at 8am, (bear in mind this insomniac didn't go to bed until 1.30 and got up at 6am!) Ann, who I met last year when she bought poor little Charlie Hedgehog, and has since become the sister I never had, lives very close to me arrived promptly and we made our way some 16 miles to Jan's house to pick her up. We were full of exited chatter as we wended our way to meet up with Sandy and Kylie another three miles on. We made our way along motorway and then onto a winding road through the most beautiful countryside to arrive at the study centre for 9.30 for meet and greet. We were given a wonderful welcome by John and Yvonne Hart and taken into the bright workshop to await the other students and have a very delicious, and welcome cup of tea.

The other students arrived, and John explained what the array tools would be used for.


and then let us sort some and tie the differing thickness into bundles.


Then John showed us the (very) complicated first weave that straightens and strengthens the base of the baskets.


The work room has large picture windows and doors leading to a large deck area that has the most astounding views...that I forgot to photograph!
The sharp eyed amongst you may recognise hoof trimmers amidst some of the other tools...
John went on to take us outside to see the different colours of willow that he uses and grows,

and explain about the soaking that is required to make it flexible enough to weave. Once soaked the willow is wrapped in wet sheets and plastic until required.

Then, when back in the workshop John showed us some of the delightful baskets that he makes.

He explained how to 'sort' the bundles of willow into different thicknesses, explaining how each one is used.


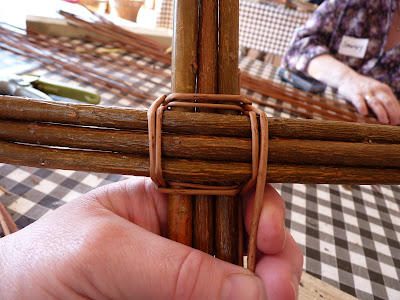
Then the work began. We were each given six sticks of fairly even thickness that had to be cut to eight inch lengths,

we then chose the three thickest and bored a hole in the centre through each, using a super sharp tool, and then worked the remaining three sticks through the hole.

We were then given twelve strands of soaked willow and shown how to start the
weave,

once the willow had been taken round twice we had to start to gently force the sticks apart to for the 'spokes' for the base. (This takes more strength than you imagine)

My effort - by no means perfect! We than had to continue adding the willow until the base was fully woven.

John handed each of us the next, long, twenty four stripped willow lengths which were to form the skeleton of the basket. After trimming off the excess from the base, which had to be re-shaped into a shallow dish by the use of brute force and your knee!
We then had to trim the ends of the stripped willow to a sharp angle before adding (forcing!) them either side of the main base 'spokes'.

At this point a few of us decided to go out onto the deck for fear of getting an eye poked out!
(Some of the delightful views are visible here)

A single stripped willow is placed either side of each spoke - my completed effort...

You can see what a huge size it has turned into.
We then carefully bent up each 'spoke' and loosely tied them near the top to commence further weaving. They looked for all the world like open tee-pees on the tables!


The weave started with three willow wands, then half way around another three were added, to a total of twelve.

The start of my effort, after adding the hefty lump of quartz as a weight...

On the way round one of the wands is 'dropped out' of the weave on each half until this part of the weaving is completed.

When this part of the procedure was done, we released the top of the stripped willow for ease of working, and I looked up through a veritable forest of stripped willow to the other class members. The workshop was very quiet at this point with the air of deep concentration.

By now, and after several cups of tea or coffee with delicious home-made cake and flap-jacks to give us sustenance, it was about 1pm and lunch time. We were shown outside to an area with stables where these dear goats were happily munching away at their lunch..

A stable door was opened and this delightful setting met our eyes...

We sat down to a most wonderful lunch of the most delicious home-made carrot, apple and cashew soup (I've asked for the recipe and will pass it on when I get it), one of John's

We were able to buy some of their lovely eggs for only £2 a dozen :o)

Back in the workshop concentration again took over as we were handed the next colour of willow for the main body of the basket, this had a silky texture and was a delight to handle. It was also a lot easier on the brain as it was the basic in and out weave (phew!)

As we worked we had to tamp down the willow to tighten the weave. The next picture is before the tamping down ;o) and before the next round of teas, coffee and more home-made cakes :o)

Deep concentration is etched on my fellow students faces as we progressed.

After we had used up the dark willow we had to soak the baskets in troughs to make the uprights supple enough to bend and weave into the top rim.

I took this opportunity to hen watch again!

When the willow had soaked enough we toddled off back to the workshop to complete out works of art. John, who is patience itself had to help all of us with this part of the basket weave. It was by far the most difficult and complicated part, I was so intent upon trying to watch and learn that I again forgot to capture a photo.
This is my completed (wonky) basket, which took about seven and a half hours to finish.

and this was how all our (5) baskets ended up, all different diameters and heights despite all using the exact same materials.

Mine is bottom right.

We went home, happy and exhausted, clutching our baskets to proudly show at home :o)
The cost of the course was a VERY reasonable £25, which included all food and drinks, but came with free laughter, new friends and a huge sense of achievement! I would certainly recommend the course and the lovely couple who ran it.
Think on, next time you look at a basket of all the work that went into it.
Next month we are returning for a day of foraging and cooking up our foraged food! Looking forward to that one :o)
If you are interested in any of the many courses that Gleanings run check out their website. (I'm not being paid for this post, but am giving an honest opinion of my experience there).
Thank you for sticking with this long post!
Best wishes to all, I'm off for a refreshing cuppa.


